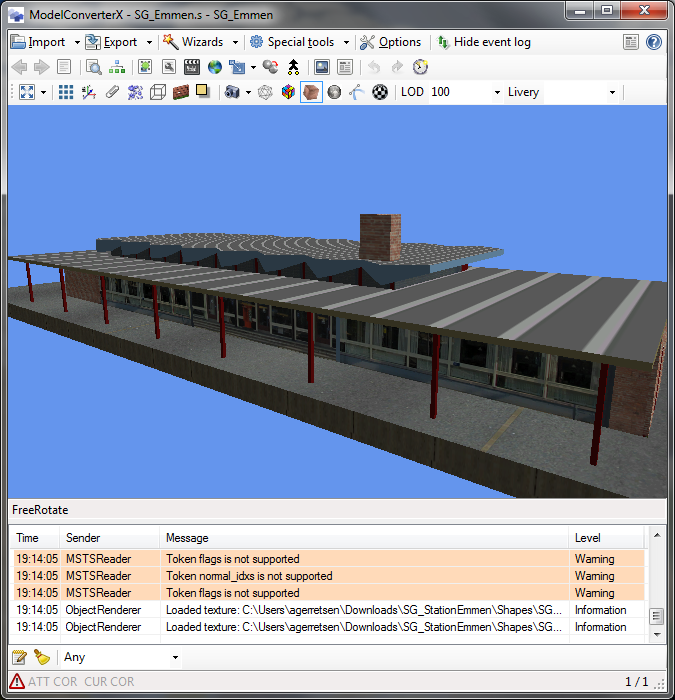
The development release of ModelConverterX now contains an updated preview of the objects. It is now using OpenGL shaders, which as enabled me to add some cool new functions. Like showing bump maps and the reflection influenced by specular maps. Be aware that this is a big change, so it might have resulted a few new bugs here and there. Please let me know if you have any issues. And in case of big issues, you can always revert to the stable 1.3 release until I have fixed them.
Instant Object Studio – part 2
Since my previous blog post about the new Instant Object Studio tool I received a review copy of the tool (thanks for that Konstantin). So I am now able to answer some of the questions I still raised in my previous post.
When placing for example a roof on a box, the tool does not remove the top polygon of the box, altough it is not visible. So that means there are slightly more polygons than optimal, but for most objects that should not matter too much for the performance. Especially if you make sure it has the same material as other polygons in the model, in that case it ends up in the same drawcall.
Speaking about drawcalls, as long as you are careful about how many materials you use when modelling, the generated scenery objects can be very light on drawcalls. As an example I tried to model the house I did for my SketchUp tutorial again with this tool. This house only uses one texture sheet, so the generated model has only one drawcall.
I also mentioned in my previous post that I did not like the visually dragging and scaling of the textures, as that makes it hard to align exactly the part of the texture sheet you want. Especially when you put all your texture parts in one big sheet that can be tricky. But there is a function in Instant Object Studio to help you with that already.
In the material settings you can select that the texture should be stretched along the X and Y axes. With the Area button you can then choose the area of the texture you want. If you then apply it to a polygon, exactly that piece of the texture will be fitted on the entire polygon. Works quite neat I would say. It’s not as flexible as the UVW Unwrap editor in GMax, but I feel it gives me better control over where the texture goes than in SketchUp. Maybe starting scenery developers won’t appreciate this feature so much, but if you try to model with one texture sheet only I feel it comes in handy.
I’ll continue to test this tool more, as it seems to be packed with interesting features. Make sure to read the manual to learn about all the shortcuts and restrictions that can be applied. Next thing I will probably test is see how easy it is to make a building when you have a photo scenery showing that building. The object I made now is in the middle of the sea. But I think this tool can be really handy to trace buildings from photo scenery. I’ll share my experiences again after I have tested this.
Instant Object Studio
Flight1 has released a new tool, Instant Object Studio. This evening I had a play with the demo version and I must say I am surprised by the tool. After seeing the video I had the impression that the tool would be nice to make some quick buildings, but that it would be hard to make really detailed photo realistic objects with it. But after testing the demo version a bit I think I was wrong there. Since the demo version does not do export, I have not yet been able to see how optimized the output generated by the tool is.
Here’s a list of the positive things I have noted:
- The concept of building your object inside FS is cool!
- Making the geometry is quite easy. The different shapes snap together and after reading the maniual (yes :)) I found out there are some easy ways to fix the movement of polygons or edges along an axis. All that together makes it rather fun to model the shape you want. It’s a bit like SketchUp. Modelling geometry in SketchUp is also fun (more fun than in GMax at least).
- When making a new material you have access to all the FSX specific settings if you want, but they are hidden under advanced settings.
- It is cool how you can easily make your own texture using the generic templates. You can adjust colours and even overlay a second texture. Nicely done, only don’t get carried away as you might end up with a lot of drawcalls.
- You have rather good control over the texture mapping. I think it is even easier than those clumsy pins in SketchUp. So even if you have all parts of your house on one texture (as you would try for good performance), it is not too hard to alter the texture mapping.
- You can attach effects and control the amount of detail in the crashboxes.
- The fact that your textures are directly saved in the format that FS needs and that your model is exported to BGL right away will be very useful for many people. It saves the steps to use BGLComp, ImageTool, etc. Especially for new developers that is very good.
Of course there are also some points I am not so sure about:
- Although the manual mentions it is important to use as few textures as possible, the way you can make generic textures could tempt a lot of people to use much more textures than is good for the performance. If you only build one of two houses it is not going to hurt, but on bigger projects it will.
- Although it is cool to work in FS directly, it also adds overhead. FS running uses more memory and CPU than the average modelling tool. And when making scenery you will often have a painting program and some other utilities open as well. I did not yet run into trouble, but I guess it could happen.
- I would like to have more control over the texture mapping, a bit like a UVW unwrap editor where you can move each vertex of the polygon to the correct texture position. But that could be me, I am a control freak and prefer to have my mapping very accurate.
Since I haven’t been able to save yet, I can’t judge yet how easy it would be to adjust your model after you made it. For example if you made a mistake in the shape of the texture mapping. I’ll probably buy the tool so that I can have a look at that. And then I can check how optimized hte output is as well.
So all in total I think this is a very nice tool for people who want to build a few scenery objects or maybe their small local airport. Working with it is quite fun (which is also important). And from the functionality point of view I think it is similar to modelling with SketchUp. You won’t get the fancy animations, levels of detail and very complex shapes that you can achieve with GMax or 3DS Max. But on the other hand it is much easier to learn and probably more enjoyable to use.
ModelConverterX 1.3 released
Just a quick note that ModelConverterX 1.3 (stable version) has been released. It is the same as the development version of yesterday, but now with a updated manual. It will be the stable release for the near future, since version 1.2 was getting very old. You can read some more information here.
Ground polygon wizard upate
I have updated the ground polygon wizard in ModelConverterX. Two new features have been added to it in the latest development release:
- You can now specify which layer and visibility are used by default in the options. This should mean that you have to change less values while working on your ground polygons.
- An option has been added to convert the textures used on the ground polygons. This means they are converted to DDS (when using FSX) or DXT BMP (when using FS2004). Before you would have to do this conversion manual. In the screenshot on the right you see the options for the texture conversion. In the text box you need to specify the location where the new textures will be stored.
Hopefully these changes make the wizard a little more easier to use!
Reading X files
I have added a new function to ModelConverterX. It can now also read X files. This can be a X file generated by the FS2004 or FSX gamepack, but also a X file generated by another tool that does not contain the FS specific information. The following features will be read from the X file:
- Geometry, normals and texture coordinates
- Material settings (including FSX specific material settings)
- LOD information
- Animations
This new functionality is in the latest development release. Let me know if you have any issues with this feature.
Yes this blog is still alive
Just to let you know this blog is still alive. Just recently I did not have too much time to post interesting things here. But that does not mean I haven’t been (silently) working on new things. Here are some of the things I have been working on recently and once they are finished you will read more about them on this blog as well:
- Improving the reading of aircraft MDL files in ModelConverterX, especially when it comes to the animations of the aircraft.
- Improving the ModelConverterX preview. I have been experimenting with using shaders and that seems to be a great way to allow reflections, bump mapping and that kind of advanced features to show in the preview as well. I might even get the skin and bone animations working in the future.
- I have also been doing some scenery design with SketchUp, working on some new objects for the NL2000 scenery.
- Oh, and last but not least, we have been preparing for the baby that can be born any day now.
That should be enough to dust off this blog for now. When I have finished some of the items listed above, you will be able to read all the details here again.
Animation Editor updated
I have update the Animation Editor in ModelConverterX. Before this form could only be used to remove all animations from your object, but now it can do more. The following features have been added:
- Select which animations are active and shown in the preview.
- Examine only sections of an animation, for example by looping only a subset of all frames.
- Remove the selected animations. These will then be “frozen” to the animation frame you have selected. This is similar to the function to remove all animations before, but now it can be done per animation.
I have made a quick video tutorial to show you how it works.
MDL Tweaker
I have just added a new feature to the ModelConverterX development release. It is a MDL Tweaker that you can find in the special tools menu.
Let me first explain how this tweaker differs from loading a MDL into ModelConverterX itself. When you import a MDL into ModelConverterX the object is read and stored in an internal representation. ModelConverterX then works with this internal representation when you make changes. In the end this internal representation is exported again to a MDL file.
The MDL Tweaker works differently, it directly manipulates the binary code of the MDL file, without decoding it to an internal representation first. This means that you can for example make small modifications without loosing animations or other elements that are in the MDL file. But it also means you are more restricted in the kind of manipulations you can make.
So what can this new MDL Tweaker do? At the moment it supports the following tweaks:
- Change MDL name
- Change MDL GUID
- Change radius as stored in the MDL file (this is similar to the function of the RADItor tool I made a while ago)
- Change the bounding box values of the MDL
- Add a custom shadow model
Below you see a screenshot of the form. After you have made the changes you want, you need to click Save MDL to saves the changes to disk. When you click the Insert custom shadow model button you will get a file selection dialogue where you can select the MDL file that should be used for the shadow model.
I would like to stress that at this moment the tweaker only works for FSX MDL files. I still need to test and adapt it to work with FS2004 MDL files as well. Also at the moment the tool might not be super robust yet, I am still working on that as well.
Custom shadow model
A recent question by Don Grovestine on the FSDeveloper forum made me look more at the shadows of FSX models. As everybody knows, turning on the shadows in FSX can have a considerable influence on the performance. But the FSX MDL format also does allow you to specify a custom model that is used to render the shadow. I did some testing today to determine how big the performance difference can be.
I started by making a rather complex object, with almost 6000 triangles. And I placed many instances of it at my favourite test location. The screenshot below shows how the scene looks with shadows. Without shadows I got a framerate of 22. When I turned on the shadows the framerate dropped to 15.
So next I made a simplified version of the model. Instead of 6000 triangles it uses only 250 triangles. And I inserted this model into my MDL as the shadow model. In this case I got 20 frames for the scene, so that is only a minor performance drop, especially compared to the original drop. The screenshot below shows the result. As you can see the shape of the spheres is less smooth in the shadow now.
In my test scene I placed a lot of objects and the object I used was rather complex. I am not sure if the performance benefit would be that big for an airport as well. But at least it shows that using a simplified shadow model can help improve the performance.
To insert the shadow model into the MDL, I used an experimental function in ModelConverterX. I will develop it further to make it useful for general usage and then put it on the development release version. Hopefully it should be available in a few days.