Just a quick note to let you all know that the online FS Developer Conference (FSDevConf) that we are organising is approaching quickly now. It is actually scheduled for next weekend. So that means that the coming week I won’t have much time to update my tools, so the reported issues will have to wait a while. I first have to prepare my presentations for the conference and to finish he other preparations for the event.
Tree detection – part 5
It’s been a while since I was working on the autogen vegetation for Nantucket. It was actually before my summer holiday. Afterwards I thought I would quickly fix some of the reported bugs and then return to this interesting issue. But as always I got carried away by adding some new features to ModelConverterX and so it is only now that I had the time to look at the autogen vegetation detection again.
Before the summer I was working on vegetation detection based on the histogram properties of an area. This worked OK, but sometimes it is hard to distinguish water and vegetation. So this time I tried another approach for which I needed imagery with a near infrared band as well. For Nantucket I was able to get hold of such imagery through the state GIS portal. It seems this kind of imagery is available for more parts of the US for free and in the coming years it is likely to become even more easily available.
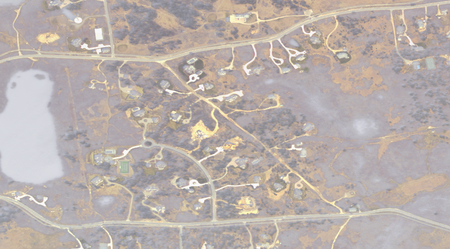
Above you see a picture of this imagery. The quality is actually less than the imagery I have used for the photo scenery. But since we want to use it to detect the vegetation it does not matter too much. The most interesting part is the near infrared channel that is included. Below you see a color infrared version of the same area shown before. As you can see the near infrared information lets certain features stand out more.
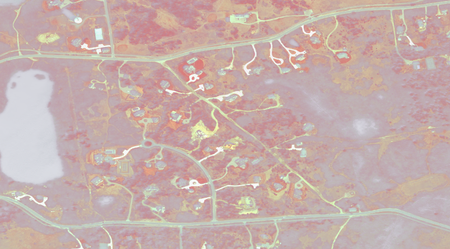
I found a common approach to detect vegetation, with is called Normalised Difference Vegetation Index (NDVI). This algorithm uses the red channel and the near infrared channel and calculates an index based on that. The higher the value, the more likely it is vegetation. So I have implemented this as an alternative approach compared to the histogram matching algorithm I used before. The first results look better, although it is sometimes still hard to distinguish between a shadow and vegetation for example. Below you see a picture with the detected trees.

I think both algorithms are OK for usage now. So I plan to finish up the GUI I have been working on that allows you to tune the algorithms for the imagery you want to process. And then I will add the vegetation detection feature to scenProc. And given the complexity of the algorithms I will also add some documentation to explain how they works and what the settings of the algorithms do.
Blender
 For a long time 3D objects for Flight Simulator could only be developed with a couple of tools. For example FSDS or GMax with the right gamepack. But over the last few years there is a trend to use more and more tools. For example SketchUp is also popular now to make scenery objects. Recently we have also seen more interest in using Blender to design for FS on the FSDeveloper forum. That’s why we have added a special subforum for it now.
To get the objects out of Blender and into FS you can best use ModelConverterX. From Blender you export as a DirectX X file. This way you can even export animations. In ModelConverterX you can then load this X file, tweak the materials and animations as needed and then export again. The X file Blender makes does not have all the FS specific extensions, but ModelConverterX will add them for you.
I’ll try to post a little more details about using ModelConverterX and Blender in the near future.
scenProc XML objects optional attributes
The scenProc processing step to create XML objects had a last argument that when provided would add the NoAutogenSuppression tag to the create XML object. In the next development release the behaviour of this last argument has been changed a bit. From now on it matters what you enter. That’s because you can now specify any of the additional tags that BGLComp supports. If you want multiple just separate them by a semicolon. The possible values are:
NOAUTOGENSUPPRESION
NOSHADOW
NOCRASH
NOFOG
NOZWRITE
NOZTEST
Grrrr, stupid MakeMDL error!
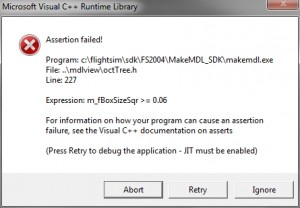 I think every designer exporting objects to FS2004 has seen the error message on the right at least once. It happens when you export a small object to a FS2004 MDL file with MakeMDL.
The reason is that somewhere inside MakeMDL, when calculating the octtree for the crash detection, some assertion is triggered. Of course this is nice to know, but it doesn’t help you as you still have that same error.
The standard fix for this in GMax is to add a fully transparent dummy box that is big enough. This will make sure that the object gets compiled by MakeMDL. And the polygons of the fully transparent box don’t end up in your MDL file, MakeMDL will filter them out for you since they are fully transparent.
Today I have updated the FS2004 MDL exporter of ModelConverterX. When you try to export an object that is small (small enough to trigger this error), it will automatically add a dummy box for you. So you don’t need to worry about it anymore. As a result you shouldn’t be bothered with this assertion message anymore in the future.
Scenery Objects Editor
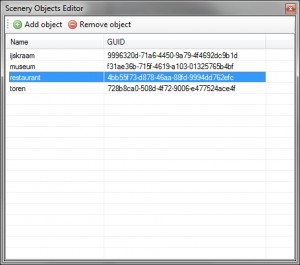 In the next development release of ModelConverterX you will find some changes to the “List objects” form. The first change is that this form is now called the “Scenery Objects Editor”. The icon in the toolbar has not changed by the way.
As the new name already indicates you can now do some editing as well. It is now possible to add or remove objects from the active scenery. When adding new objects you will be given a dialogue to select the file you want to insert.
You might think that this functionality sounds very similar to Library Creator XML. In a way it is. With this new function you can now also manage your object library from ModelConverterX. There are a few important differences though:
- Library Creator XML can only handle MDL files. In ModelConverterX you can add objects from any of the supported formats. The tool will automatically convert when needed.
- Library Creator XML does not alter your MDL files. It just creates the correct XML code to make your library BGL. When adding the objects in ModelConverterX the tool will import them into its internal representation. When saving the library they will be exported again to the requested format. This might mean that certain elements could be altered (although for scenery MDL files you shouldn’t run into too much trouble).
Object report and image video tutorial
Here is the video tutorial about the improved object report and object image functionality of ModelConverterX that I promised earlier this week.
Scenery (tool) designer
![]() As many of you probably know I am a member of the Netherlands 2000 Scenery team for almost 15 years already. Or actually I should say I was. Because I have decided to stop working as a part of the team.
As many of you probably know I am a member of the Netherlands 2000 Scenery team for almost 15 years already. Or actually I should say I was. Because I have decided to stop working as a part of the team.
This decision has nothing to do with the team, they still make a great freeware scenery of the Netherlands (go check it out if you don’t know the scenery). I have made the decision because I don’t enjoy creating scenery as much as I did in the past.
What I enjoy is finding new ways to make scenery and making tools. Within the work I did for the NL2000 team I couldn’t give those aspects enough attention and with a small child at home I could not combine making tools and scenery at the same time anymore.
So I have now chosen to focus on what I enjoy most and that is making tools. So I’m no longer a scenery designer, from today I am only a scenery tool designer.
New GUI for object images and reports
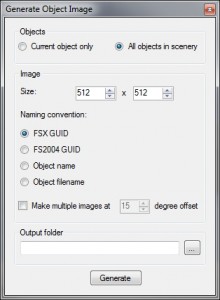 In the next development release two new graphical user interfaces will be added. Both for the object report function and for the object image function there is a GUI now.
The object report function can be used to create a HTML file with information about the loaded object or library. It includes a thumbnail image and information about for example the textures used or the attachpoints of the object. With the new GUI you can now select which information you want in the report and you can also set the size of the thumbnail image.
The object image function was just a simple capture of the preview window before. This function now also has a GUI where you can set the size of the image and the naming convention of the file. The size of the image is not linked to the preview anymore, it can even be bigger than your screen size. So if you want you can make a nice high resolution rendering of your object.
A last new feature in the object image editor is that you can also set an option to create multiple images. In that case you specify a rotation offset and for each image the object will be rotated by the angle. So for example you make screenshots of your object with a 30 degrees offset between them. This can be useful if you want to show your object from multiple angles.
I plan to make a video tutorial about these new features soon.
Repackaged development release
 Until now the development release (or should I just say beta version) of all of my tools was released as one big ZIP file with all the different tools in it. I have changed this now. So from now on you can download a separate ZIP file for each tool. The file contains all files needed to run the tool, so you can install them each in their own folder if you want. I have uploaded the development releases page to contain the correct links.
Why did I make this change? Mainly because the ZIP file was growing in size too much. And with some other developments that are in the pipeline it would have grown even more. That would mean every single download would take quite a while, while not all user are probably interested in all tools. So by splitting it into multiple files people can download what they need and the download times also stay more manageable.
So please update your links and let me know if there are any issues!