Import resample configuration

The scenProc IMPORTGDAL step to import imagery data assumes that the imagery you use is georeferenced in some way. So for example as GeoTIFF or as BMP file with an accompanying world file. But that is not always the case of course. Some developers use unreferenced images and provide the needed coordinates in the INF file for resample.

Therefore I have now added a new step to scenProc that will read these INF files: IMPORTINF. This will go over the INF file and for each image defined in there add it as a feature to scenProc with the correct georeferencing. Afterwards you can use the image in the DETECTFEATURES step for example.

Detect features, holes and performance

The scenProc feature to detect holes from imagery often returns polygons with holes, especially in area with dense forests and some clearings in the forest. When the ProcessHoles option is set to true the holes will be processed for the output of the detect feature step as well.

But I have to give a warning, for big and complex polygons the output is sometimes corrupt. I will try to fix that issue, but for now you can improve the output by first applying a split grid step to slice your imagery into chunks. When the detect features step is run on those chunks the output is better in general. See an example configuration file below:

IMPORTGDAL|..\geo\imagery\gtif_wgs84_4band\321778.tif
 #
 SPLITGRID|0.001
 #
 DETECTFEATURES|FTYPE=RASTER|filter_ndvi_test.tfc|OBJ|FOREST
 #
 MERGEGRID
 #
 EXPORTSHP|OBJ=FOREST|trees_test

As you can see I used quite a small grid (even smaller than the autogen grid). In the end I use a merge grid step to combine all the cells again and export them as one shapefile. That shapefile I can then use in my further processing to autogen.

An added benefit of the SPLITGRID step is that the performance of the feature detection gets better. When I ran it on the image as a whole it took around 4000 seconds, but now with the small chunks it takes only 300 seconds. So for better performance using split grid is also a good advice.

Autogen statistics

telraamAfter all the recent experimentation with running scenProc in batch mode I was curious how many autogen objects I had created in the end. So I made a little tool that will count the objects in a folder full of AGN files. This tool I called agnstats and will come with the next agntools development release.

I know this tool is not really useful for development. But maybe you can impress your friends with the numbers or else you can use it to brag a bit about the amount of autogen you made in your documentation. Below is an example of the output:

Autogen statistics for folder: texture
Generic buildings
505028 5ae04eb6-934c-4f63-bb48-5e7dee601212 Roofs Gabled _ALL_
21562 311de8c7-e596-4e28-a94d-da09d0252ce4 Flat roofs for medium short buildings
Total: 526590
Polygonal vegetation
93168 db9149ee-bb9d-4da6-89c8-2c4900eed8fa Terrain Autogen Class Deciduous Broadleaf Forest
6118 a4a30975-075c-49ec-87fb-7e0931cb5004 Terrain Autogen Class Coniferous Forest
9349 c9dc45ae-f240-42a9-a137-b7617452a308 Terrain Autogen Class Mixed Forest
Total: 108635
Rectangular vegetation
299482 c9dc45ae-f240-42a9-a137-b7617452a308 Terrain Autogen Class Mixed Forest
343208 2903412b-69a1-4a63-94c9-a799b91afdbf tb Bush General 3-8 ft
Total: 642690
Library objects
Total: 0

scenProc batch processing

When you want to process bigger quantities of data with scenProc the graphical user interface is not always the easiest way to do this. In that case it is much easier if you can call scenProc from a script, for example a batch file. This is already possible for a while, but yesterday I have made some changes to make this mode of running scenProc even more powerful.

Let’s just start with some details on how to run scenProc from the command prompt. Below you see the syntax. The first argument you provide is the configuration file you want to use. The /run argument tells scenProc to directly run the configuration after opening, so that you don’t have to press any buttons to start it. This will also ensure that scenProc automatically closes when it is finished. The /log is optional, but when you provide it the messages from the event log are written to the indicated file when the processing is done. This allows you to check what happened later on.

scenProc myfile.spc /run /log mylog.txt

So far for the batch options that were already available (only the argument to generate the log has changed). What I have added now is that you can also pass additional variables into the scenProc configuration. This makes it possible to use one template scenProc configuration and customize using the variables exactly what will happen.

Let’s give an example. Let’s assume you have a folder with different shp files and you all want to process them with the same scenProc configuration. Then you should call scenProc each time with a different filename as variable. For example:

scenProc myfile.spc /run /log mylog.txt input13.shp

In your configuration file you will also have to make a change. Your configuration file would become like this:
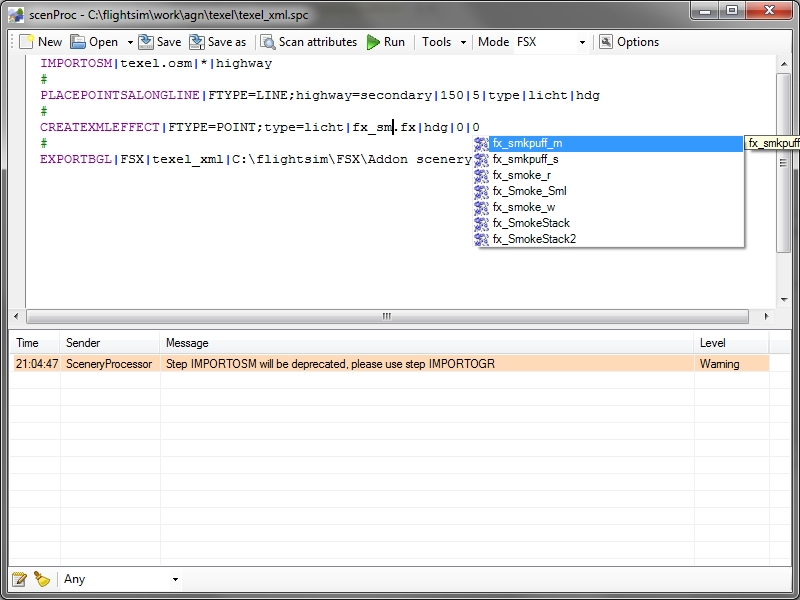
# @0@= test.shp
#
IMPORTOGR|@0@|*|*|NOREPROJ
#
SPLITGRID|AGN
CREATEAGNPOLYVEG|FTYPE=POLYGON|{guid}
WRITEAGNFILES|FSX|texture

As you see in the IMPORTOGR step we don’t provide a filename, but the user variable number surrounded by @. You should always start counting from zero and the number is the order in which you provide the variable from the command prompt. While running scenProc will substitute this special code with the value you passed.

As you can also see I put a special comment at the top of the file. In this comment I also assign a value to the special batch variable. This value in the comment is only used if you run from the GUI, so that way you can still test your configuration. But when running from the command prompt it is ignored.

But of course you can use this to pass other things than file names. You could also use this to process your data in parts. Let’s take this configuration file as example:

IMPORTOGR|country.osm|@0@;@1@;@2@;@3@|*|NORPROJ
#
SPLITGRID|AGN
CREATEAGNPOLYVEG|FTYPE=POLYGON|{guid}
WRITEAGNFILES|FSX|texture

In this case the user variables are used to specify a different bounding box for the data to read. So you can specify different extends every time you call scenProc and thereby process a big area in pieces, without having to preprocess all your data.

I hope this feature is useful and I’m sure some of you will come up with even more interesting ways to use this.

I need 6 seasons!

Image2014-01-03 2121.27.675
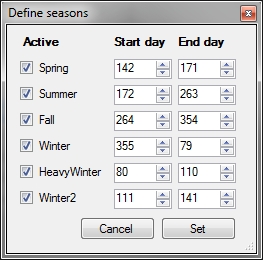
I guess you learned at school that there are 4 seasons in each year. But when you start making scenery for Flight Simulator you will see that FS actually has 5 seasons. Besides the usual seasons spring, summer, autumn and winter, FS also has a heavy winter season. This means winter with snow actually.

So in the ground polygon wizard of ModelConverterX you could define these 5 seasons before. But today I have added an extra season, which I called winter2. This allows you to have a “normal” winter without snow before and after the heavy winter season. For those of you making scenery of more northern areas that will be useful I think.

So there you have it, the ground polygon wizard now has 6 seasons available for you.

Placing effects

Although the scenProc tool is mainly used to create autogen files, it is also capable to produce BGL files using BGLComp. A processing step to place library objects this way has been available for quite a while. Today I have added another step that uses the BGLComp exporter, it can be used to place effect files.

This new CREATEXMLEFFECT step takes almost the same attributes at the CREATEXMLLIBOBJ step. The only difference is that instead of a GUID you provide the effect name. And of course you can specify the effect parameters to control when the effect is active in FS.

In the scenProc GUI to auto completion will show you all effects that are available in your FS installation, so that makes it easy to pick the right one. The screenshot below shows the auto completion and also shows a very basic configuration where I place XML effects (I generated the points to place my effects using the PLACEPOINTALONGLINE step).

Image2014-01-03 2104.49.254

FSDeveloper fully operational again

Maybe you have noticed already, but the FSDeveloper website is fully operational again. The fsdeveloper.com domain has been unblocked again, so everything is working as it was before. The fsdeveloper.org domain that we registered as a fallback will remain active as well.

As you probably guessed already we were not happy with the support of the registrar, as it took almost 2 weeks to get the domain unblocked again. So we are moving the domain to another registrar. This might give another small interuption of the fsdeveloper.com domain in a few days.

FSDeveloper DNS work around

To work around the DNS problems of the FSDeveloper.com domain, we have registered another domain. So until the issues with FSDeveloper.com have been solved, you can use FSDeveloper.org to reach the FSDeveloper community. We have also updated the settings of TapaTalk, so for those of you using that app on their smartphone or tablet, you can reach the forum again as well. Only be aware that the fsdeveloper.com email addresses still don’t work. So you can’t use these to reach Jon or me.

We hope that our main FSDeveloper.com domain is available soon again, but we depend on the support of the registrar for that. Until now their support has been very disappointing. So we don’t know how long it will still take. For now please use this workaround.

OGR power!

For the new scenProc feature to detect features from imagery I started to use the GDAL/OGR libraries. But since the OGR library supports reading many vector formats, I have now also add a new step that allows you to read in data through this library. It is called IMPORTOGR. The attributes are the same as you are used to for the other formats, you specify the filename, the optional geospatial filter and the coordinate system used in the file.

The big advantage is that the OGR library supports many formats. So this makes it possible to load even more data into scenProc. So you can for example read SHP or OSM XML. But also the binary OSM PFB, KML, GML and many many more.

Using the OGR library I think I also have better support for features with holes. Before that was only supported when reading from SHP and for complex features it didn’t always work. That should have been improved now as well.

The existing steps like IMPORTSHP, IMPORTOSM and IMPORTKML are now deprecated. Which means I will not develop them further and they will be drop in a future release. So you are advised to switch to the new IMPORTOGR step. Let me know if there are features that used to work in the old steps, but no longer in the new one.

One feature from the old IMPORTOSM step is not yet implemented, that’s the ability to filter on the attributes and only read the features of the attributes you need. I hope to add such a feature to the new OGR reader as well. Any ideas on what would be the most convenient way to do this are welcome. Assuming that you users are using this attribute to limit the memory usage.