Reading complex OpenStreetMap files

I got some error reports about the scenProc IMPORTOGR step. Sometimes it would throw an error that interleaved reading mode should be used. This mainly happened on bigger, more complex files. But when working on my Nantucket test area I also noticed that reading with certain required attributes stalled and got in some kind of endless loop.

I have now fixed both of these problems. So in the next development release it should be easier to use OpenStreetMap data in scenProc.

Where did my options go?

In the next development release of scenProc some options are gone from the global options form of the tool. But I have not removed them, I have just moved them to the configuration file. That way it is easier to enter different values for these options for different projects (especially when using batch mode).

So which options are affected by this?

  • KeepXML is now an option in the EXPORTBGL step
  • ProcessHoles is now an option in IMPORTOGR and DETECTFEATURES. Be careful though, the new option is called DONTPROCESSHOLES. The default behaviour is now to process the holes.

Detect features and holes

I have just fixed some bugs in the scenProc detect feature step. With these fixes the holes in the detected features should now be processed correctly. Before the holes where not always represented correctly.

Be aware that processing holes in features does take more processing time. So you might see that detecting the features takes longer if you have processing of holes enabled.

RADItor update

When I updated my tools to be Prepar3D v2 compliant there was one tool that I forgot, RADItor. RADItor is a small tool that is mainly used by aircraft developers to edit the radius and bounding box values of a MDL file. Sometimes these values need to be tuned for the aircraft to display correctly in the aircraft selection window for example.

I have now made a new version of RADItor that can edit P3D v2 MDL files as well, besides FSX MDL files. You can get the new version from here.

Download links

After the recent move of the FSDeveloper site to another server some of the download links to my tools as reported here on the tools pages were broken. I have now fixed them all.

All of the files are now hosted on this website directly, so you browse all old stable releases in one place if you want.

OGR is the way to import from now on

Today I have finally deprecated most of the pre-OGR importers. So that means that IMPORTSHP, IMPORTOSM and IMPORTKML are no longer available in scenProc as steps. You have to use IMPORTOGR from now on to read those (and many more formats).

One of the main reasons to deprecate them is to get rid of the dependency on the Microsoft Access database driver, which was used by the shapefile library used by IMPORTSHP. This dependency gave a lot of crashes, since it seems not everybody read the manual to check what other dirvers need to be installed.

With the switch to OGR this problems should be less. However I am seeing some crashes now from people that are related to the OGR libraries as well. These seem to be caused by wrong .NET framework versions. Make sure you have .NET framework 2.0 and 3.5 installed when using scenProc.

Subtracting features

Image2014-02-04 2128.26.430One of the issues with creating autogen is that vegetation polygons might suppress buildings. When the vegetation overlaps the building the building will not be shown. This can be a bit annoying, since you would like the building to suppress the vegetation normally.

To work around this problem I have added a new step to scenProc. With this step you can subtract features from each other. So this allows you to subtract the buildings from the vegetation polygons. That way both of them will show up correctly in the autogen. As you can see on the picture the step also allows you to add a small buffer zone that removes vegetation that is near the building.

The syntax of the step is as shown below. The first argument is the filter to select the polygons you want to subtract from. In this case I’m selecting forest polygons. The second attribute is the filter to select the features that should be subtracted. In this case I select my buildings. The third argument is the scaling that should be applied to the features that are subtracted. So in this case I double their size to get a buffer area. The last argument is optional. If you provide MINAREAPOLY there the algorithm will subtract the minimum area polygon of the feature (the best fitting rectangle), instead of the feature itself. For buildings that is often what you want, since the autogen buildings are created from this minimum area polygon as well.

SUBTRACTFEATURES|type=forest|type=building|2.0|MINAREAPOLY

scenProc manual

instruction-manual From now on you will find a PDF manual inside the scenProc downloads. At the moment not all sections of the manual are finished, but I will try to complete it as soon as possible.

With all the recent changes to scenProc and with some of the functions being quite complex, I think it is important to have an up to date manual with the tool. I will for example describe in detail how the feature detection works.

This PDF manual will replace the manual on the wiki. I generate it from LaTeX source code that I keep together with the scenProc source code. So I’ll try to directly update the manual when I make some changes. That way you should always find up to date information.

Different scenProc download links

A few weeks ago I made two versions of scenProc available on the development releases page. One for 32 bit operating systems and one for 64 bit operating systems. Since both of these files are rather big, due to the inclusion of all the GDAL/OGR libraries, it means that downloading an updated version can take a while. Therefore I have now added a third version, called scenProc update. This version only includes my own files and not the external libraries. So once you have installed either the x86 or x64 version, you can use the update version to patch it to the latest development release every time.

Which texture on my autogen building?

The autogen SDK shows us how the texture sheet that is used for generic autogen buildings is structured. There are parts for houses, medium/large building and warehouses. See the images below that comes from the SDK.

agnBuildTexture

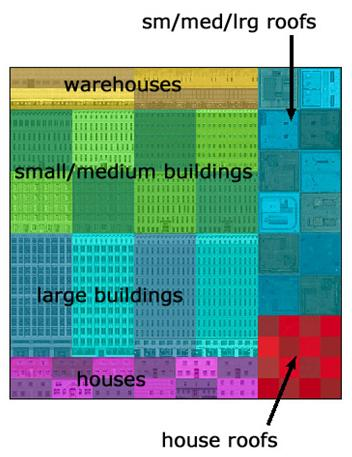
But the SDK doesn’t tell us which type of building get’s which part of the texture sheet. On obvious parameter determining which part of the texture is used is the height of the building and that depends on the height distribution that you set for the autogen file. But the length and the width of the texture also influence which part of the texture is used.

So I set up a test with buildings of different sizes and I made a table of the resulting texture that was shown. I have used the same colours as shown in the SDK picture below. So houses are pink, small/medium buildings are green, large buildings are blue and warehouses are green.

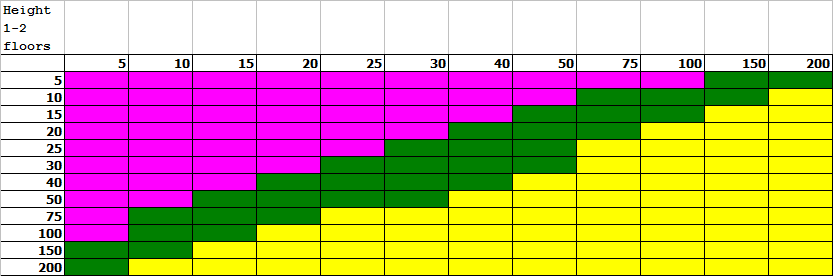
Below is the resulting table for buildings with 1 or 2 floors. The numbers shown in the headers are the width and the height of the building in meters. As you can see the small buildings all get the house part of the texture sheet, but once the buildings get bigger the medium buildings part is used (of course only the first two floors of that sheet). And even bigger buildings get the warehouse part of the sheet.

agnBuildLow

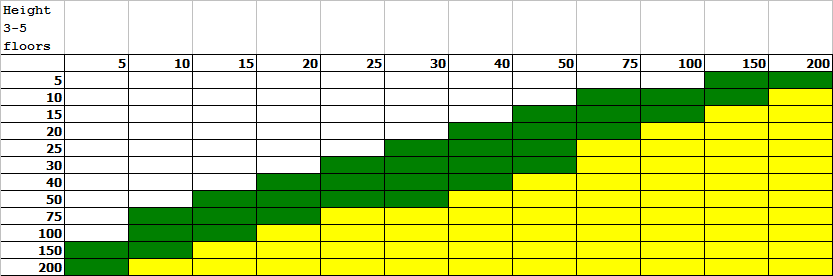
Below a similar table is shown, but than for buildings with between 3 and 5 floors. As you can see it is quite similar to the previous table. The white part indicates buildings that do not show with this height. These buildings do show with only 1 or 2 two floors and therefore follow the table above.

agnBuildMed

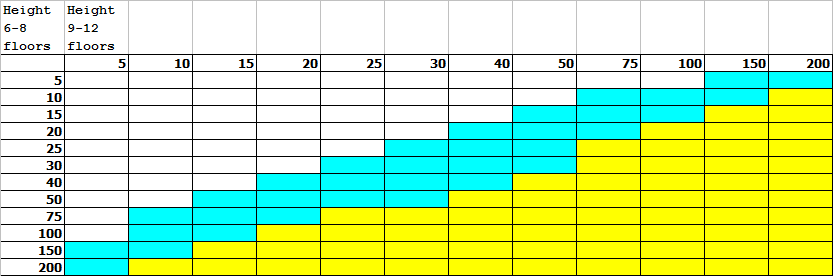
Below you find the table for the highest two building categories, 6-8 and 9-12 floors. The table is almost the same as the one above, expect that the large buildings part is used instead of medium buildings.
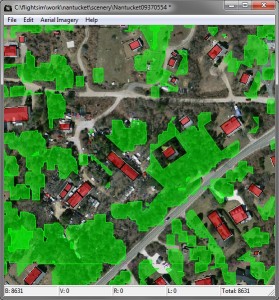
agnBuildHigh